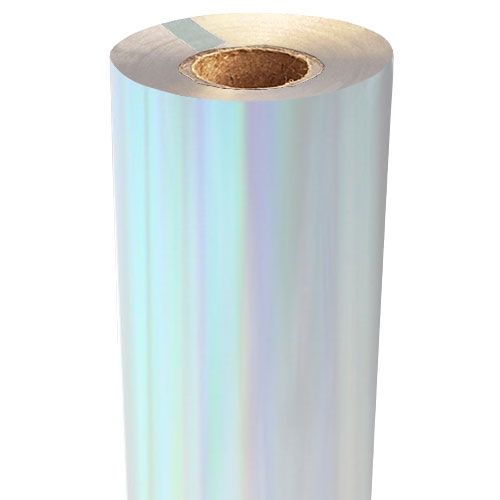
Rainbow Iridescent Laminating Toner Foil with Clear-Underlay #TP-146 (Price Per Roll)
- Pattern: Rainbow Iridescent
- Color: Transparent Underlay (Clear)
- Choose from many roll widths, lengths and core sizes
- Sticks to dry toner prints when heat is applied
- 0
- 1
- 2
- 3
- 4
- 5
- 6
Overview
• Foil Roll
• Heat Source (Pouch Laminator², Roll Laminator² or Fuser)
• Smooth Paper Stock³ Printed with Dry Toner
Specifications
| Item # | IRDFOILTUR-GRP |
|---|---|
| Manufacturer | Binding101 |
| Manufacturer Item # | FF-TP-146 |
| Color | Transparent/Clear |
| Design | Rainbow Iridescent (TP-146) |
| Roll Size | 8" x 100', 12" x 100', 24" x 500' |
| Core Size | 1/2", 1" |
| Foil Series | "S" Series |
| Quantity | 1 Roll |
| Shipping Weight | 3, 5, or 8 lbs. |
Description
With our clear iridescent foil fusing rolls you get a beautiful rainbow design that changes in the light. The underlay is clear so you can see your toner color underneath the design; this lets you keep the rainbow effect more toward a specific color or tone. You can choose from several different roll sizes and core sizes, and custom-cut widths are also available by special order.
Iridescent toner foil is perfect for adding a touch of class or uniqueness to business cards, letter hear, wedding invitations and so much more. These foil rolls are applied with the consistent heat and pressure that is offered by our foil fusing machines. It will stick to the dry toner¹ that is used in most standard copiers (and some laser printers). Reactive foils work well with smooth paper stocks³ of many kinds - all you have to do is print your design or text using a dry toner copier, then apply this foil to your page and run it through a foil fusing machine or pouch laminator². When the page comes out of the machine, just peel off the foil sheet and you will have a gorgeous foil pattern that has stuck to the toner only. These iridescent colors offer a shimmery, rainbow look that really stands out.
What Machines can Foil:
You can use a foil fusing machine to apply consistent heat (to activate the adhesive) and pressure (to ensure a clean and consistent application). Other heat machines, such as pouch laminators, may work as well, however, may require more heat testing and adjusting to get a perfect finished print. Here are some important considerations for various methods of foil fusing:
| Method/Machine | Pouch Laminator | Roll Laminator | Foil Fuser |
|---|---|---|---|
| Roll Size | Any Size. Pieces of foil are cut off the roll before applying. |
Varies on machine width | Varies on machine width |
| Core Size | Any Size. Pieces of foil are cut off the roll before applying |
Varies on machine core | May vary by machine; most use a 1" core roll |
| Heat | Minimum heat requirement: 300° F Higher is recommended Adjustable is recommended |
Minimum heat requirement: 300° F Higher is recommended |
N/A; Specifically made for foil rolls |
| Speed | Adjustable speed is highly recommended | Adjustable speed is highly recommended | N/A; Specifically made for foil rolls |
How to Foil
The method you use to foil will vary significantly based on the kind of machine you are using; a foil fuser, a roll laminator, or a pouch laminator. We have several blogs and resource posts about foil, including instructions for various methods. Click here and search the word "foil" to browse our foil blogs.
¹ The adhesive on the back of these foil rolls sticks to dry toner only; it will not work with wax based inks from laser printers.
² Compatible pouch laminators require certain features; they must be able to reach at least 300°F, have adjustable speed and temperature settings, be the proper width for your machine. If using a roll laminator, the machine must also have a film rewind feature and a matching core size. Other variables may factor into compatibility. Click here to see a list of laminators tested and approved for foiling. Note that transparent hologram foils may require more heat or more time under heat than other foils.
³ The adhesive applies well to smooth paper stocks of a variety of thicknesses. It does not, however, create a solid/consistent look on textured papers.
Videos
How to Foil with a Pouch Laminator
Ok, so the first thing you need to do it print the design you want to foil. It needs to be printed using a dry toner ink onto a smooth paper stock. Thicker paper like cardstock works fine, as long as there is no texture and the ink used is a dry toner (not an inkjet or other wax-based ink).
You are also going to need a pouch carrier, which is this fold... Read More
Ok, so the first thing you need to do it print the design you want to foil. It needs to be printed using a dry toner ink onto a smooth paper stock. Thicker paper like cardstock works fine, as long as there is no texture and the ink used is a dry toner (not an inkjet or other wax-based ink).
You are also going to need a pouch carrier, which is this folder here. This is going to protect your laminator.
Now place your printed sheet onto the pouch carrier, and lay your foil roll over your design. Make sure all the ink that you want to foil is covered. Next, cut your foil to fit the design.
Place the foil with the non-colored, gray side down over the portion of your design that you want to foil.
So I’ve trimmed my foil, and now I am going to place a piece of scrap paper on top of the foil to prevent it from transferring onto my carrier. If your foil overlaps your printed sheet, you can also place a piece of scrap paper below your design.
Now bring it over to your pouch laminator, which should be pre-heated. The temperature to use is going to vary quite a bit, depending on the supplies you are using, including the paper thickness, the laminator, and even the foil itself, because some colors need a little extra heat. You may need to do some testing before you can get the perfect finish, so be sure to have plenty of printed sheets to work with.
I am using the professional, James Burn SpeedyLam 330R, set to 150 degrees Celsius (or about 300 degrees Fahrenheit) using a speed setting of 2. Other laminators may work as well, but there are a couple things you need to keep in mind… they need to have adjustable heat and adjustable speed settings in order to work. They also have to hit really hot temperatures, the minimum typically being about 300 degrees Fahrenheit (but again, that will vary depending on several factors, which is why adjustable heat is necessary). It also needs to be able to handle a 10 mil thick pouch minimum, since we are using a thick pouch carrier and scrap paper.
If you’re using one of the smaller home office pouch laminators, it might still work, you may just have to run it through more than once to get the foil to stick.
So we’re going to lay our carrier flat and open it up. There may be some static, which for me lifted up my scrap paper. You can kind of see where it grabbed the design here. Now find an edge and peel it up.
This is my favorite part...Voilah! You’re done.
The color used is our regular metallic gold, which is our most popular. We have several other golds available, including matte gold and rose gold too. Plus a ton of other colors, holographic patterns, iridescent rainbow colors, and more.
You can see here that I should have placed a piece of scrap paper below my design, because my foil overlapped my print and stuck onto my pouch carrier.
Thanks so much for watching, I hope you enjoyed this video. Be sure to subscribe to our YouTube channel for more foiling videos, as well as a ton of other videos about all the products that we have to offer at Binding101.com
_____________________________________________________________
PACIFIC SUN by Nicolai Heidlas Music https://soundcloud.com/nicolai-heidlas
Creative Commons — Attribution 3.0 Unported— CC BY 3.0 http://creativecommons.org/licenses/b...
Music promoted by Audio Library https://youtu.be/kbqmEJTr3nU


![Rainbow Iridescent Foil Fusing Rolls [Transparent Underlay] Image 1](https://www.binding101.com/media/catalog/product/cache/4806281b0b4d25b598359cb75ace4a3c/i/r/iridescent-rainbow-transparent.jpg)


![Rainbow Iridescent Foil Fusing Rolls [Transparent Underlay] Image 6](https://www.binding101.com/media/catalog/product/cache/4806281b0b4d25b598359cb75ace4a3c/r/a/rainbowiridescent_transparent_1024x1024.jpg)


